post

The Basics of Hardwood Floor Refinishing

Hardwood Floor Refinishing Bergen County NJ involves sanding off the current finish and applying a new coat of stain. A high-quality, low-VOC finish is used for protection and beauty.

It’s important to remove the furniture and close off doors and windows to keep dust contained during sanding. During this step, it’s also important to wear protective gear like a mask and goggles.

hardwood floor

If your wood floors are starting to show signs of wear and tear or you simply want a change, refinishing is an affordable option. However, it’s important to understand the process in order to avoid mistakes that can turn your weekend project into a costly endeavor.

First, clear the room of all furniture and other items that might get in the way of the refinishing process. You’ll also want to move any houseplants that are in the area. Then, sand the floor using a medium-grit sanding pad. This will remove any scratches and dents, as well as prepare the surface for staining. It’s important to sand the entire surface of the wood, including the underside and faces of the boards.

After sanding, vacuum the floor thoroughly to eliminate any dust that may have accumulated in the corners of the room. Then, stain the hardwood floor to your desired color. We recommend choosing a water-based polyurethane for the final coat because it’s less toxic than an oil-based product and has fewer volatile organic compounds (VOC) that can contaminate indoor air.

After the stain has dried, apply 2-3 coats of polyurethane. It’s a good idea to buff and vacuum between polyurethane coats. Be sure to follow the manufacturer’s instructions for application. Once the last coat of polyurethane has been applied, allow the wood to acclimate for 24 hours before moving back into the room. Hardwood floor refinishing takes time and effort, but it’s an investment that will pay off in the long run by protecting your home’s wood flooring from damage and extending its lifespan. It’s also a great way to increase the value of your home.

Sanding your hardwood floors is a messy process, but it’s one of the most important steps in the refinishing process. The sanding process removes the old finish and bare boards, so your new finish will stick. You will need to have the right sanding tools, and plenty of room to work. A large drum sander and a set of 80-grit disks are your best bet. You will also want to have a vacuum to collect the dust.

For your first sanding pass, use the drum sander to sand the center of the room. Then, switch to an edger for the edges of the room and around furniture. Be sure to wear a mask or respirator when sanding. The fine dust can cause sinus problems and other health issues. For your second sanding pass, you will need to switch to an even finer grit — such as 100-grit. The final sanding is with a buffer, which will smooth out any blemishes in the floor and leave it looking like new wood.

You will need to repair any major scratches or gouges with wood putty. Let this dry for at least 24 hours, then sand again with medium-grade sandpaper and wipe the floor clean with a tack cloth.

It is a good idea to close all the windows and doors in the room where you are working to keep the dust contained and out of the rest of the house. You should also cover any items on the walls, such as pictures and curtains, with plastic and painter’s tape. It’s also a good idea to open a window or two to improve ventilation. Professional refinishers have special containment systems in place to keep the dust and fumes contained.

Once the sanding process is complete, it’s time to stain the hardwood. The best stain for wood floors is oil-based, low VOC (volatile organic compound), and tinted to allow the homeowner to choose a color that fits his or her style.

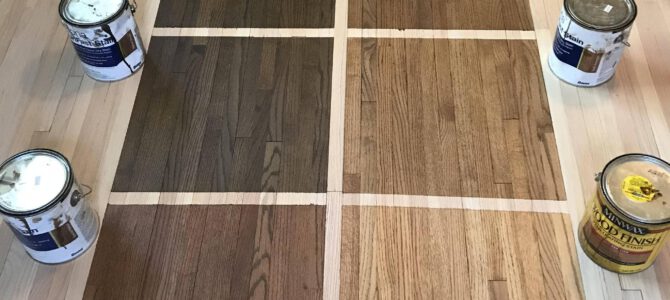
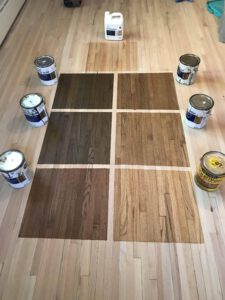
When choosing a color, it’s important to keep in mind that different types of wood respond differently to stains. It’s also a good idea to test a small area of the floor with the chosen color before applying it to the entire room. It’s a good idea to use two or three different shades of stain on the floor to create a more interesting look.

The first step in staining is to prep the room by vacuuming and dusting to remove all particles of dirt from the floor. It is also a good idea to close all windows and doors during this stage to prevent dust from blowing around the house. The floor is then rubbed down with a soft cloth to remove any remaining dirt and grime. Next, the room is vacuumed again and wiped down with tack cloths to ensure an ultra-clean surface.

Finally, the floor is stained any desired color and 2-3 coats of polyurethane are applied. The polyurethane protects the floor and adds a glossy shine that looks beautiful in any home. It’s also easy to maintain and resists scuffing and abrasions.

Depending on how many coats of polyurethane are used, a smooth finished hardwood floor can be refinished up to five times, though in most homes they would only need to be refinished four or five times before it’s time for a new look. It is also important to choose a topcoat finish that is designed specifically for wood floors.

Hardwood floors are renowned for their durability, but over time they can become dull, scratched or discolored. Whether the damage is minor or severe, there are several ways to revitalize wood floors, including refinishing and resurfacing. It’s important to understand the difference between these two processes before deciding which one is best for your home.

Refinishing is a labor-intensive process, but it can give your floors a new lease on life that will last for years to come. The process requires sanding, staining and then sealing. Depending on the extent of the damage, refinishing can take a few days to a few weeks.

During the sanding and staining stages, it’s essential to keep pets and children out of the area. This will protect them from falling shards of wood as well as the strong chemical fumes. In addition, it’s best to remove all furnishings from the room being refinished. This will allow the refinishers to work efficiently and ensure that your furniture is protected from the strong polyurethane odor.

After sanding and staining, your hardwood floors will need to be sealed. This step is essential to preserving your investment. When choosing a sealer, consult the manufacturer’s instructions to get the best results. Most manufacturers recommend that you apply at least two coats of sealer to your hardwood floor.

While refinishing hardwood floors is an investment, it can bring your old floors back to life. When properly maintained, your hardwood floors will remain beautiful for a lifetime. Regular sweeping, dust mopping and vacuuming will help to keep the surfaces free of debris that can act like sandpaper, causing scratches. Regularly cleaning with a product like will also help. This product was specifically created to refresh old, previously sealed hardwood floors and can fill light scratches and soften dings.

Hardwood floors don’t stay gorgeous on their own; they need a coat of finish to protect them from the daily wear and tear of being walked on. Refinishing will give your floors the fresh look they need to look beautiful once again, and it is a very worthwhile investment that adds value to your home.

First, the floor is vacuumed and wiped down to remove any debris or dirt that might mar the final look of the finished wood flooring. Then, the floor is buffed to help the finish adhere to the wood. Finally, a lambswool applicator is used to apply the desired amount of wood finish. It is recommended that two to three coats of polyurethane be applied. Each coating will dry for about 8 hours.

This is the most time-consuming part of the entire process, but it is also the most important. It is vital that every dust particle is removed from the room before applying a new coating of hardwood floor finish. If you skip this step, you will end up with a floor that looks like it was sanded and refinished five times before.

Once the floor is fully buffed and dry, the stain can be applied. It is highly recommended that you use an oil-based wood finish as opposed to a water-based one. This type of stain dries much more slowly than the water-based version, and will give you plenty of time to touch up any spots where the finish does not adhere properly.

After the stain has dried, a second coating of polyurethane can be applied to the wood flooring. The floor should be buffed in between each coat of finish to help with the adhesion.

post

Planning A Kitchen Remodeling Project

Kitchen remodeling remains one of the most popular home renovation projects. Many homeowners choose to open up their dated, claustrophobic kitchens by tearing down walls (potentially load-bearing) and reconfiguring appliances.

Before construction begins, you’ll need to plan carefully. Design-build remodelers can help with this process by estimating project costs and creating options that fit your budget. Talk to Thompson & Boys LLC experts before getting started.

kitchen remodelingCabinets

Cabinets are a major expense in any kitchen remodeling project. You can give your cabinets a facelift with new hardware, or completely change the style. A contractor can help you with a layout that will fit your space, and they will know what is doable within your budget. They may suggest removing upper cabinets to make your home feel bigger or installing open shelving. They can also advise you on a backsplash design that will complement your cabinets and tie the room together.

When choosing materials for your cabinets, the contractors can recommend a variety of products and options, including solid wood, plywood, MDF or particle board, and stainless steel. They can explain the benefits of each, including cost, durability, and maintenance. They can also point out features that will increase the functionality of your cabinets, such as built-in pantry shelves, spice racks, and additional drawers or bottle storage units.

Cabinet companies have connections and relationships that often make their products compatible with other kitchen fixtures and accessories. This allows them to offer you a full package that will give your remodel an overall cohesive look, and it can save you money. This is something you should discuss with your contractor before purchasing any components of your cabinets online. Unlike buying a car online, you will be living with the look and feel of your cabinets for years to come. You wouldn’t want to regret your decision based on an uninformed online purchase, and neither would your contractor. They will be responsible for ordering all of the necessary materials, and they need them to arrive on time to avoid any delays in your kitchen remodel.

Countertops

Countertops play a major role in kitchen design. They are expected to be durable (stain-proof, scratch-proof, and heat-proof), beautiful, and affordable. They are also one of the most prominent elements in a kitchen, making it an important design choice to consider when planning your kitchen remodel.

The most budget-friendly countertop options are laminate and quartz, which are highly stain-resistant. For homeowners who prefer a more natural look, granite and marble are popular options, though both require regular sealing to prevent damage. Wood offers a warm aesthetic, but it can be susceptible to dents and scratches.

Some materials can also be difficult to maintain, so it’s important to carefully consider your lifestyle and budget before making a final decision. If you want to cook and entertain frequently, for example, you might benefit from a higher-quality countertop like stainless steel or quartz that can resist heat and stains better than wood.

Another consideration is how much storage space you need. Drawers and cabinets are great for stowing away pots, pans, cookie sheets, cutting boards, and other cooking equipment. A kitchen remodel is an ideal time to install additional storage, since you’ll be able to add extra shelving or a recessed pantry that won’t take up valuable floor space.

Lighting is another important factor to consider, especially if your kitchen will be opening up by removing interior walls. Flush-mounted ceiling fixtures, pendants over islands, and recessed lighting above sinks are all good choices to brighten work zones and highlight key kitchen design features. Be sure to include dimmer switches, so you can adjust the mood as needed.

Appliances

The kitchen appliances you choose have a big impact on the overall design of your space. It’s important to keep your budget in mind as well as the quality, functionality, and style of the appliances you’re interested in. A kitchen remodel isn’t complete without state-of-the-art equipment that makes cooking and cleaning easier and more fun!

It’s also important to think practically about the location of your appliances. A time-tested design concept, known as the Kitchen Triangle, suggests that your sink, refrigerator, and stove (or cooktop) should form a triangle for ease of movement when preparing food. Keeping this in mind as you make your selections will ensure that your new kitchen is efficient and functional.

Lighting is a crucial consideration for the entire room, but it’s especially important in the kitchen. Having the right kind of lights can make it easier to see what you’re doing and can help reduce eye strain. For ambient lighting, consider flush or recessed fixtures, while task lighting is best for illuminating countertops and workspaces. For decorative accents, consider a variety of lighting options like pendants or multi-light chandeliers, under-cabinet lighting, and more.

Consider how you’ll store trash and recycling containers during the remodeling process. Having designated bins is convenient and keeps items out of sight, which can add to the overall aesthetic of your kitchen. Be sure to include enough plug-ins along the backsplash and island for all your electronic devices, too. For maximum safety, look for GFCI outlets, especially near water sources. You might also want to upgrade to USB sockets, which are quickly becoming a must for many modern devices. These little details will help your kitchen remodel go smoothly and keep you from running into unexpected expenses later on.

Flooring

A kitchen needs to be comfortable and easy to work in, so flooring options are important. It can also make a big difference in the overall appearance of the space. If you’re considering hardwood floors, this may require the removal of cabinets, countertops, and appliances to prepare the space for new installation. This can increase the overall cost of your remodel.

Vinyl flooring is a popular affordable kitchen floor option, offering a range of color and pattern choices. It’s also easy to clean and generally impervious to water issues. For a more durable and comfortable floor that can withstand heavy traffic, consider adding a thin layer of foam padding under the vinyl.

Laminate flooring offers a more realistic wood look at a fraction of the cost. It’s easy to install and can be made softer to stand on with the addition of foam padding underneath. This is one of the few flooring types that can’t be refinished, so make sure you choose a quality product with a good warranty period.

Tile is a classic kitchen flooring material that can be used in a variety of ways to add visual interest to the room. For example, oversized tiles can help a small kitchen feel bigger by reflecting more light around the room. It’s possible to create a bold design statement with tile, but caution is needed to avoid making too many patterned or colorful floor choices as they can be harder to maintain and damage over time.

A large kitchen remodel is typically a major undertaking that might involve moving walls, bumping out exterior windows, or adding an addition to the house. This type of remodeling project often requires significant plumbing and electrical changes that can significantly add to the overall cost.

Lighting

It’s easy to forget about lighting when planning a kitchen remodeling project, but it can make or break the room’s look and functionality. A good lighting plan can help the new space feel bigger and brighter, while a bad one can make it seem smaller and dingy.

The first consideration when selecting light fixtures for your kitchen is the style you want. There are many choices, from traditional chandeliers to modern recessed fixtures. Look for fixtures that coordinate with the style of your home, especially if you have an open floor plan. Quartz light fixtures come in an array of styles and finishes, including ones that mimic the variegation of natural marble and limestone, as well as wood.

Keeping the work area well-lit is another important consideration when choosing new kitchen light fixtures. Task lights are typically located at head height and can be found over the sink, a counter, or other work zones. They should be bright enough to illuminate your cooking area and prevent shadows from forming on your food or other tasks.

Accent lighting is also a popular addition to kitchens, with options such as recessed can lights and pendants that can accentuate the beauty of your backsplash or other architectural features. Plinth lighting, which can be installed under cabinets, is often used to highlight art or other cherished items, such as an heirloom cutting board.

It’s possible to overspend on a kitchen remodel, so it’s essential to create a budget that includes the cost of all necessary fixtures and finishing touches. A qualified kitchen designer can help you make the best choices for your budget and create a design that will be both functional and beautiful.